Learn and Practice First Aid Skills
If you are interested in learning first aid skills, there are many sources to choose from.
Some are professional organizations, schools, or clubs offering classes and training programs.
Lifesaving Clubs, for example, make the process of learning and practicing first aid skills fun.
Evaluation of first-aid knowledge
First aid knowledge is essential to help people during an emergency. There is a growing need for first aid knowledge to be tested systematically.

- Comprehensive 240 piece first aid kit to address cuts, scrapes, eye, and trauma injuries.
- Convenient bonus 44 piece first aid kit that can be easily carried in your pocket, backpack, or glove compartment.
- Specialty items included specifically for trauma injuries such as a tourniquet, Israeli bandage, and splint.
- Color coded and labeled for easy identification and organization, ensuring quick access in emergency situations.
- Designed for various settings including outdoors, workplace, home, trucks, cars, and offices.
Last update on 2026-10-09 / Affiliate links / Images from Amazon Product Advertising API
First Aid Knowledge: Basic Skills with Explanations
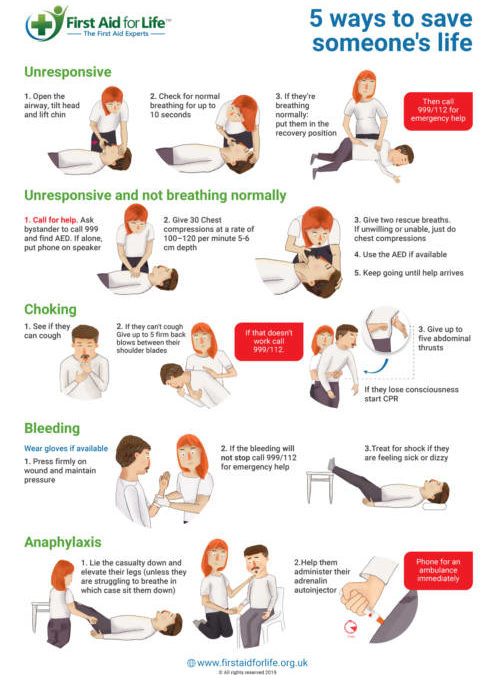
1. CPR (Cardiopulmonary Resuscitation)
- Purpose: To keep blood flowing and oxygenate the body when someone’s breathing or heartbeat has stopped.
- Steps:
- Check for safety and responsiveness.
- Call for emergency help.
- Place the person on a flat surface.
- Perform chest compressions: Center the heel of your hand on the chest, interlock fingers, and press down firmly and quickly, aiming for 100-120 compressions per minute.
- If trained, you can provide rescue breaths by tilting the head back slightly and lifting the chin, covering the person’s mouth with yours, and blowing air into their lungs.
2. Treating Burns
- Purpose: To relieve pain, reduce temperature, and prevent infection.
- Steps:
- Cool the burn under running cool water for at least 10 minutes.
- Remove any tight items or jewelry from the affected area before it swells.
- Apply a sterile gauze bandage lightly without putting pressure on the burn.
- Take pain relief if necessary and avoid applying creams or ointments unless prescribed.
3. Stopping Bleeding
- Purpose: To control blood loss and prevent shock.
- Steps:
- Wear gloves if possible.
- Apply pressure directly on the wound with a clean cloth or bandage.
- Maintain pressure by binding the wound with a thick bandage or clean cloth.
- Raise the injured area above heart level if possible.
- Do not remove the cloth or bandage if it becomes soaked; add more layers.
4. Treating Sprains and Fractures
- Purpose: To reduce swelling and immobilize the area to prevent further injury.
- Steps:
- Rest the injured limb.
- Ice the area for about 20 minutes every two hours to reduce swelling.
- Compress the injured area with an elastic bandage to provide support.
- Elevate the injured limb above heart level.
5. Choking Relief
- Purpose: To clear the airway blockage.
- Steps:
- Ask the person if they are choking and if you can help.
- Stand behind the person and wrap your arms around their waist.
- Place a fist with one hand just above the person’s navel.
- Grasp your fist with your other hand and perform quick inward and upward thrusts until the blockage is dislodged.
6. Heat Stroke Prevention and Treatment
- Purpose: To cool down the body in life-threatening overheating.
- Steps:
- Move the person to a cooler place.
- Remove excess clothing.
- Cool the person by whatever means (e.g., wet clothes, fan).
- Offer sips of water if the person is conscious.
7. Seizure Management
- Purpose: To protect the person from injury during an uncontrolled episode.
- Steps:
- Clear the area around the person to prevent injury.
- Place something soft under their head.
- Please do not hold the person down or put anything in their mouth.
- Monitor breathing and prepare to turn them on their side if vomiting occurs.
These first-aid techniques are critical in managing emergencies until professional help arrives or conditions improve. Always prioritize calling for medical help in serious situations.
First aid is the first step until medical treatment is administered. Children suffer from injuries that can lead to life-long problems.
Educating children about first aid is essential to prevent these common illnesses.
No products found.
First Aid Skills to Control Severe Bleeding
Controlling severe bleeding is critical as it can be life-threatening. Immediate and effective action is necessary to manage this condition.
Here are detailed steps to control severe bleeding:
1. Ensure Safety
- Description: Before approaching the injured person, ensure the environment is safe for you and the victim to prevent further injury.
2. Wear Protective Gloves
- Description: If available, put on protective gloves to reduce the risk of transmitting infections.
3. Apply Pressure
- Description: Use a clean cloth or sterile dressing to apply firm pressure directly to the wound.
- Details: Press down firmly with your palms to control bleeding. Continue to hold pressure to help clotting occur.
4. Use a Bandage
- Description: Secure the cloth with a bandage if bleeding does not stop with direct pressure.
- Details: Wrap the bandage tightly enough to maintain pressure but not so tight as to cut off circulation. If blood soaks through, do not remove the initial cloth or bandage; add more layers.
5. Elevate the Injured Area
- Description: Elevate the wounded area above the level of the heart, if possible, without causing further pain or injury.
- Details: This helps reduce blood flow to the injury, slowing the bleeding.
6. Apply a Tourniquet
- Description: If bleeding is severe and not controlled by other means, consider applying a tourniquet.
- Details:
- Place the tourniquet 2-3 inches closer to the torso from the wound. Never place it directly over a joint.
- Tighten it until the bleeding stops.
- Note the time of application (important for hospital staff later).
- Tourniquets can cause significant tissue damage, so they should only be used as a last resort and only if you are trained in their use.
7. Immobilize the Body Part
- Description: Keep the injured body part as still as possible.
- Details: Movement can dislodge clots that are forming and increase bleeding.
8. Monitor for Shock
- Description: Keep an eye on the person for signs of shock, which include pale, cold, clammy skin, rapid breathing, or loss of consciousness.
- Details: If no injuries prevent this position, lift the person down with their legs slightly. Cover them with a blanket to keep them warm.
9. Call for Emergency Help
- Description: Call emergency services as quickly as possible.
- Details: Provide clear information about your location and the injured person’s condition. Continue to apply first aid measures while you wait for help to arrive.
In any case of severe bleeding, it’s crucial to act quickly and efficiently, prioritizing immediate first aid while waiting for professional medical assistance. Even if you manage to stop the bleeding, always follow up with emergency services.
No products found.
First Aid Skills to Apply CPR (Cardiopulmonary Resuscitation)
CPR is a life-saving technique used in emergencies when someone’s heartbeat or breathing has stopped.
Here are detailed steps on how to perform CPR:
1. Check the Environment and the Victim
- Description: Ensure the area is safe for both you and the victim.
- Details: Check for any potential hazards such as fire, traffic, or electrical wires.
2. Assess Responsiveness
- Description: Gently tap the victim’s shoulder and shout, “Are you okay?” to check for consciousness.
- Details: If there is no response, proceed with calling for help.
3. Call for Help
- Description: Dial emergency services immediately if the person is unresponsive.
- Details: If possible, send someone else to call while you start CPR.
4. Open the Airway
- Description: Position the person on their back and open their airway.
- Details:
- Tilt the head back slightly by lifting the chin.
- This helps to clear the passage to the lungs.
5. Check for Breathing
- Description: Listen closely for breathing sounds and watch for chest motion.
- Details: Do this for no more than 10 seconds to avoid delaying CPR if the person is not breathing normally.
6. Give Chest Compressions
- Description: Perform chest compressions to help restore blood flow.
- Details:
- Place the heel of one hand on the center of the person’s chest and your other hand on top, interlocking your fingers.
- Keep your elbows straight and shoulders directly above your hands.
- Use your body weight to help you administer compressions at least 2 inches deep and at 100 to 120 compressions per minute.
- Let the chest rise completely between compressions.
7. Provide Rescue Breaths
- Description: Give rescue breaths to supply oxygen to the lungs.
- Details:
- After 30 compressions, pinch the nose shut and cover the person’s mouth with yours, creating an airtight seal.
- Give two rescue breaths, each over 1 second, ensuring the chest rises with each breath.
- If you are not trained or comfortable giving breaths, continue compressions only.
8. Continue the Cycle
- Description: Continue CPR cycles until signs of life or professional medical help arrive.
- Details:
- Follow a cycle of 30 chest compressions followed by 2 rescue breaths.
- Do not stop CPR except in these situations: you notice signs of life, trained help takes over, the scene becomes unsafe, or you are too exhausted to continue.
9. Use an Automated External Defibrillator (AED) if Available
- Description: If an AED is available, it should be used immediately.
- Details:
- Turn on the AED and follow the voice prompts.
- Apply the pads on the person’s bare chest as indicated on the package.
- Allow the AED to analyze the heart rhythm and follow instructions to deliver a shock if it directs you.
Performing CPR can significantly increase the chances of survival following cardiac arrest. It is crucial to remain calm and follow these steps meticulously until emergency medical services arrive.
Lifesaving Clubs make first-aid training fun.
If you want to learn how to save a life, why not join a Lifesaving Club?
Not only will you have a lot of fun, but you’ll also learn valuable first-aid skills and practice your newfound abilities in various events.
Whether you are a lifeguard or want to have fun, you can join an International Lifesaving Club.
You can even join a group of friends to learn first aid.
Many groups meet every week, and you can take part in a wide range of activities.
You can watch movies together, go camping, and even climb mountains. This is a great way to improve mental and physical health and bond with friends.
Can a Lifesaving Society club be started at your school? The first step is to find a full-time staff member and a school advisor.
Then, you’ll need to form a president and obtain the necessary awards. Your group will need the support of a teacher and at least fifteen or thirty children.
Finally, you’ll need a letter of permission from the school.
While you may not need to do much besides learn how to save a life, having a few basic skills will ensure you’re ready for any emergency.
These important skills will help you spend precious minutes waiting for emergency responders to arrive.
Whether you’re a lifeguard or want to make your group safer, a Lifesaving Club is a good place to begin. Join one today.
Hopefully, you’ll never need them, but if you do, you’ll be able to be confident in your ability to help.